

What is Integrity Check?
Integrity check is used during app development to slow down or prevent tampering of the released mobile application in order to stop adversaries from exploiting it.
Different methods are used to preserve user data privacy, protect sensitive information, prevent theft or fraud, etc. Integrity check mechanisms calculate the checksum of the application code and/or resource files during runtime and then compare it to the precalculated "ground truth" that was calculated before mobile application release, during the development phase.
When the malicious dynamic libraries are loaded into the application bundle, the integrity of the application is compromised; therefore, the main focus of this solution is to detect such scenarios and provide its users the ability to monitor the detections and to predefine custom actions that will be executed when a detection happens.
Through the process of jailbreaking, an attacker can remove software restrictions imposed by the manufacturer on the iOS mobile device. Once the restrictions are removed, it is possible to modify applications installed on the device and maliciously exploit them.
For example, a PIN validation method can be modified in a way that allows an attacker to bypass a login screen. By using an integrity check at the mobile application start, the mechanism can detect that the application is compromised and notify the user of any potential risk. The most common technique that Integrity Check can detect is binary patching. Patching is the process of changing the compiled app, e.g., changing code in binary executables, modifying Java bytecode, or tampering with resources. This process is known as modding in the mobile game hacking scene. Patches can be applied in many ways, including editing binary files in a hex editor and decompiling, editing, and re-assembling an app.
App Protector – Integrity check implementations
App Protector Integrity Check has two types of standalone implementations:
- Android SDK
- iOS SDK
Android SDK
Integrity Check for Android devices consists of 2 parts, the Integrity Check Gradle Plugin and the Integrity Check SDK.
The plugin fingerprints the application contents during the build process. Then, it saves and packages the fingerprint with the application code in the .apk/.aab file, and also uploads it to the Integrity Check backend if online mode is enabled and configured.
The implements the SDK and uses it to initiate the runtime validation of the application integrity.
During the runtime validation, SDK fingerprints the application contents again and compares them with the original fingerprint calculated during the application build process. The fingerprint is validated using the integrity check backend for (online mode) or by comparing with the original fingerprint packaged with the application (offline mode). If any discrepancies are found, this is an indication that the application code has been tampered with.
iOS SDK
SDK for iOS devices performs runtime calculations of a value derived from the application fingerprint combined with the provisioning profile used for signing the application. The derived value represents the integrity of the application. A change in the value indicates a change in the integrity of the application. When an integrity check is performed a runtime calculated value is compared with the main value stored on the integrity check backend side.
Before performing integrity check on a real mobile application, the app data (and the value mentioned above) needs to be enrolled on the iOS integrity check backend side. The iOS Integrity check backend consists of a secure server and a MacOS frontend application.
After a build process is finished and an .ipa file is exported from the Xcode project used during the development, the main value (derived from the application fingerprint combined with the provisioning profile used for signing the application) can be calculated and enrolled on the secure server. It is done by dragging and dropping .ipa file in the MacOS application. The main value is the main source of truth. This means that if the main value is tampered with, all future integrity checks have no effect. In order to ensure that the state of the main value remains uncompromised, it has to be calculated before the application is published to the App Store and for that purpose, a MacOS application is used. The frontend application will present the following mobile app data:
- Bundle ID – the application’s unique identifier;
- Value derived from the application’s fingerprint combined with the provisioning profile;
- Current status of application’s integrity, which could be;
- App waiting for first run;
- Integrity maintained;
- Integrity compromised;
Integrity status is updated on every request for validation received from the mobile side.
If a hacker performs an attack on the iOS application, the integrity of the application will be compromised and every further value validation attempt will fail. The change in integrity status will be visible on the Integrity portal and the iOS app will be notified.
After running the app on an iOS device SDK will perform an integrity check, and since the app was previously modified, it will result in failure, meaning that the integrity is compromised. An app will display an appropriate message and the Portal will show “Integrity compromised message” next to the corresponding application identifier.
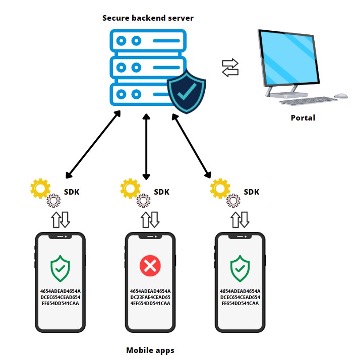
Reactions to detected compromised integrity are defined on the SDK level and are fully customizable; reactions should be defined by the developer depending on the needs of a particular implementation.
Types of Integrity Check
There are two types of Integrity checks:
Online Integrity Check
- Performs real-time integrity checks via server communication (making this connection more secure)
- Protects the application from runtime attacks and installation on unsafe devices
- Requires an active internet connection
- Enables data display on the AppProtector portal
- Provides dynamic protection
Offline Integrity Check
- Does not require an internet connection and is conducted locally
- Does not provide direct protection to the application on the client-side
- Uses pre-stored hashes or signatures for verification
Android integration
Environment setup
Integrity check SDK uses android build tools during operation. It is necessary to add the latest version of build tools to the system path variable. Minimum supported build tools version is 35.0.0.
Windows
- In the search bar type: Edit system environment variable
- Click the first item
- Enter admin credentials if prompted
- Click the ‘Environment Variables’ button in the bottom
- In the ‘System variables’ window, highlight ‘Path’, and click ‘Edit’.
- In the Edit environment variable window, click ‘New’ and enter the full path to the latest version of Android SDK build tools used, i.e.:
C:\Users\USERNAME\AppData\Local\Android\sdk\build-tools\35.0.0 - Click ‘OK’ in each opened window and restart the system.
Linux/macOS
- Open ~/.bash_profile or ~/.zshrc (depending on which terminal you use) in any text editor
- Add the following line with the full path to the latest version of Android SDK build-tools directory:
export PATH=~/Library/Android/sdk/build-tools/35.0.0/:$PATH - Save file and restart system.
The following section explains how to setup the integrity check in your Android project.
Include Integrity Check
There are multiple ways to include Integrity Check in your project.
Include as a local dependency
Add the integrity-check-plugin.jar file somewhere within your Android Studio project (for example in the 'plugins' folder like in the picture below)
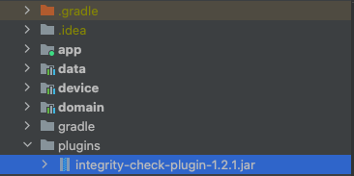
Inside the buildscript scope of the project scope build.gradle file you must add the following repository entry with the relative path to the .jar file
buildscript {
    repositories {
    	flatDir {
            dirs("plugins")
    	}
    }
}
Add the plugin id as a classpath dependency (in the root project build.gradle file):
dependencies {
    classpath("hr.asee.android.integrity:integrity-check-plugin:2.2.0")
}
In the main application module’s build.gradle file, apply the following plugin id using one of the following methods:
plugins {
    id(“hr.asee.android.integrity”)
}

apply {
    plugin('hr.asee.android.integrity')
}
Add the SDK .jar somewhere in the project so it can be imported as a dependency.
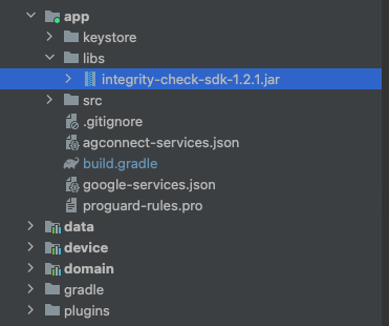
Next, add the SDK jar (integrity-check-sdk-2.2.0.jar) through the dependency block in the build.gradle files of the modules in the project where on demand integrity validation is used. (the default is the app module).
dependencies {
    implementation(files(“libs/integrity-check-sdk-2.2.0.jar“))
}
Include using custom online repository
If you have your own online maven repository, add the artifacts to the repository, and include the repository to the project:
buildscript {
    repositories {
    	maven {
    	    url = mavenRepoURL
    	    credentials {
        		username = artifactoryUser
        		password = artifactoryPwd
            }
    	}
    }
}
artifactoryUser and artifactoryPwd variables need to be replaced with credentials to access the custom server.
Plugin still needs to be added to the root project build.gradle file using the classpath configuration:
dependencies {
    classpath("hr.asee.android.integrity:integrity-check-plugin:2.2.0")
}
Then the SDK .jar archive can be added to the online repository and can be added as dependencies just using their group id, artifact name and version (either standalone or withTokenSdk version).
dependencies {
    implementation(“hr.asee.android.integrity:integrity-check-sdk-withTokenSdk:2.0.0“)
}
And in the main app module’s build.gradle file, apply the following plugin id:
plugins {
    id(”hr.asee.android.integrity”)
}
Plugin configuration
For integrity check to work, it needs to be added to the build.gradle or build.gradle.kts file.
Add the integrityCheck {} instruction after the android configuration block in the build.gradle file of the app module
android {...}

integrityCheck {}
Inside the block, parameters need to be configured before usage.
buildTypes and flavors
Build types and flavors for which the plugin is run can be configured using the buildTypes and flavors parameters respectively.
The flavors parameter is a map object. The key of the map are the flavor dimension key strings, and the values are list of all the flavor dimensions. For instance, if you have the flavor dimension environment, then the values would be something like in the example below:
android {...}

integrityCheck {
    buildTypes = listOf("release")
    flavors = mapOf("environment" to listOf("prod", "atest"))
	…
}
In the example shown, integrity check is applied to all variants that are of the build type release and of the environment production, dev or demo,
licenceKeys
Before use, a valid licence key must be added to the configuration. The licence key is bound to the application id, so a singular licence key can only be used for one application id.
Format for adding licence keys is in form of a map with key being the application id and the value being the licence key, both strings.
android {...}

integrityCheck {

    licenceKeys = mapOf("com.example.app"      to   "23E35GD3-055E3539-AEFA25FD-DA2AD2A3-0D128D36",
                        "com.example.app.test" to   "3D5CB33A-1B170D42-BE89EC53-AD184B75-3D6DD4EE")
}
keyId
The key id of the public key used for online integrity validation. This is used only for the generation of the file with application binaries that should be uploaded to the integrity check backend for every release. The key id is generated/received during first time setup of the online integrity check mode.
android {...}

integrityCheck {
	...

	keyId = “134ea2a5-35e1-45d9-abbe-85382a0be2e9“
}
Plugin implementation
If integrity validation is required on a section of code, the validation method must be called.
First, an IntegrityCheckFactory object must be created with the application context.
val integrityCheckFactory = IntegrityCheckFactory(context = applicationContext)Next, the IntegrityCheckFacade object is created using the factory method createIntegrityCheckFacade.
The method takes the licence key as String parameter and has two optional parameters.
First one is an ApplicationSignatures object with signing certificate hashes if application repackaging protection is used.
The second one is the IntegrityCheckOnlineConfig parameter if online integrity validation is used (more about this in chapter
val integrityCheckFacade = integrityCheckFactory.createIntegrityCheckFacade(
		LICENCE_KEY,
		ApplicationSignatures.createSha256(listOf(APPLICATION_SIGNATURE)),
		integrityCheckOnlineConfig
)
Then, the validateIntegrity method should be called from the parts of the code that require integrity validation. The method has one required parameter, the IntegrityCheckCallback interface that needs to be implemented and passed through.
integrityCheckFacade.validateIntegrity(integrityCheckCallback)The IntegrityCheckCallback interface has two methods that need to be overridden, one called when the integrity validation fails and the other when it succeeds.
val integrityCheckCallback = object : IntegrityCheckCallback {
   override fun processFailure(integrityCheckResult: IntegrityCheckResult.Failure) {
      // Action to execute on failure, i.e. exit the application
   }

   override fun processSuccess(integrityCheckResult: IntegrityCheckResult.Success) {
      // Action to execute on success, can be online or offline success (online takes precedence)
   }
}
The offline validation is run only if the online validation fails or is not available (no IntegrityCheckOnlineConfig parameter, or no connection).
Offline validation is a less secure option then the online check, so if both modes are used, it is recommended to limit access to your app if only the offline validation passes.
@Override
public void processSuccess(@NonNull final IntegrityCheckResult.Success success) {
    if (success instanceof IntegrityCheckResult.OfflineSuccess) {
        // limit some application features
    } else {
	// OnlineSuccess -> proceed normally
    }
}
The failure method has a parameter of IntegrityCheckResult.Failure type that has the IntegrityCheckException field containing information about the failure with more information about the error and an error code. List of errors is available in the IntegrityCheckErrorCodes class and at the end of this document.
Repackaging protection
To use this feature, you need the SHA-256 hash of the certificate used for signing the application.
There are multiple ways to obtain the hash, the main difference being whether Google App Signing is used.
It is recommended to hide the used certificate hash in code, if possible, use string obfuscation.
Without Google App Signing
If the application does not use google app signing, then we get the certificate hash from Android Studio or directly from the keystore where our signing key is located.
If the signing configuration is setup in Android Studio, we can use the Gradle command:
./gradlew signingReport    # MacOS/Linux
.\gradlew signingReport    # Windows
This generates the hashes of the certificates used for signing our application. Example for default Android debug key:
Variant: debugAndroidTest
Config: debug
Store: /Users/<username>/.android/.android/debug.keystore
Alias: AndroidDebugKey
MD5: 15:D0:D4:47:83:81:CC:14:07:AA:74:CA:0E:DE:B2:4C
SHA1: 38:26:B3:26:22:83:01:E1:AE:C1:16:21:8A:DC:82:95:16:1F:42:85
SHA-256: 2C:8D:67:2C:E2:A3:11:80:49:89:A6:67:95:73:B0:0B:8E:CC:12:15:34:67:06:61:9F:E2:0D:D4:A8:10:DD:9F
The relevant hash is the SHA-256. Can be with or without the ‘:’ separator. Example without the separator:
val applicationSignatures = ApplicationSignatures.createSha256(
    listOf("2C8D672CE2A311804989A6679573B00B8ECC1215346706619FE20DD4A810DD9F")
)
If the signing configuration is not present in Android Studio, you can access it directly from the keystore using the keytool
keytool -list -v -keystore "/Users/<username>/.android/debug.keystore"In the output find the alias used for signing your app and copy the SHA-256 hash.
Your keystore contains 1 entry

Alias name: androiddebugkey
Creation date: Feb 28, 2022
Entry type: PrivateKeyEntry
Certificate chain length: 1
Certificate[1]:
Owner: C=US, O=Android, CN=Android Debug
Issuer: C=US, O=Android, CN=Android Debug
Serial number: 1
Valid from: Mon Feb 28 16:43:10 CET 2022 until: Wed Feb 21 16:43:10 CET 2052
Certificate fingerprints:
         SHA1: 01:98:08:1C:CD:85:EA:D8:25:BA:CC:39:71:37:CF:A3:10:C1:71:DB
         SHA256: B6:09:2B:97:4A:75:B7:01:5F:98:6B:95:8C:68:F2:15:51:5F:04:8E:33:E7:39:21:F0:F6:54:40:7C:58:1A:A9
Signature algorithm name: SHA1withRSA (weak)
Subject Public Key Algorithm: 2048-bit RSA key
Version: 1
Use the hash string to create the ApplicationSignatures object.
val applicationSignatures = ApplicationSignatures.createSha256(
    listOf("B6:09:2B:97:4A:75:B7:01:5F:98:6B:95:8C:68:F2:15:51:5F:04:8E:33:E7:39:21:F0:F6:54:40:7C:58:1A:A9")
)
If you are using multiple certificates for signing, add them all to the list:
val applicationSignatures = ApplicationSignatures.createSha256(
    listOf("B6:09:2B:97:4A:75:B7:01:5F:98:6B:95:8C:68:F2:15:51:5F:04:8E:33:E7:39:21:F0:F6:54:40:7C:58:1A:A9",
           "2C8D672CE2A311804989A6679573B00B8ECC1215346706619FE20DD4A810DD9F")
)
With Google App Signing
If your application uses google app signing, then you need to obtain the certificate hash from the Google Play Console. Instructions located at the link.
Use the obtained certificate to create the ApplicationSignatures object and then use the object to create the IntegrityCheckFacade instance:
val applicationSignatures = ApplicationSignatures.createSha256(
    listOf("B6:09:2B:97:4A:75:B7:01:5F:98:6B:95:8C:68:F2:15:51:5F:04:8E:33:E7:39:21:F0:F6:54:40:7C:58:1A:A9")
)
When using Google app signing, only the hash obtained from Google Play Console should be added to the list of certificate hashes.
This means that successful testing can only be done via the Google Play Console (internal app testing etc.) as applications signed with the upload key will fail the validation.
Online Integrity Check
The online integrity check mode requires a running integrity check backend instance.
The parameters needed to initialize the IntegrityCheckOnlineConfig object are obtained using the backend.
const val INTEGRITY_CHECK_ENCRYPTED_API_KEY = "encrypted-api-key-base-64"
const val INTEGRITY_CHECK_SERVER_URL = "https://integrity-check.com/integrity-check"
const val INTEGRITY_CHECK_REC_URL = "https://integrity-check.com/rec"
const val INTEGRITY_CHECK_PUBLIC_KEY = "..."
const val INTEGRITY_CHECK_PUBLIC_KEY_ID = "7fb64f97-a10e-4aea-b742-db466942c3e5"
const val INTEGRITY_CHECK_TENANT_ID = 1
const val INTEGRITY_CHECK_POLLING_PERIOD = 5L


private val integrityCheckOnlineConfig = IntegrityCheckOnlineConfig(
    serverUrl = INTEGRITY_CHECK_SERVER_URL,
    recUrl = INTEGRITY_CHECK_REC_URL,
    publicKey = INTEGRITY_CHECK_PUBLIC_KEY,
    publicKeyId = INTEGRITY_CHECK_PUBLIC_KEY_ID,
    tenantId = INTEGRITY_CHECK_TENANT_ID,
    encryptedApiKey = INTEGRITY_CHECK_ENCRYPTED_API_KEY,
    integrityPollingPeriod = INTEGRITY_CHECK_POLLING_PERIOD
)
Creation of the IntegrityCheckOnlineConfig object
serverUrl– URL of the integrity check backendrecUrl– URL of the REC reporting server where integrity validation requests are sentpublicKey– base64 encoded String of the public key used for backend communicationpublicKeyId– String ID of the public key used for backend communicationtenantId– the tenant ID used on the integrity check backendencryptedApiKey– public key encrypted api key used for authorization during SDK requestsintegrityPollingPeriod– optional long value, for setting the time between subsequent requests checking the result of the online integrity validation. Default value is 5 secondsexecutorService– optional ScheduledExecutorService object to be used for execution of online integrity validation in the background. If none is set, a new ScheduledExecutorService object is created.
The IntegrityCheckOnlineConfig is then used for the creation of the IntegrityCheckFacade object.
When online mode is used, the creation of the IntegrityCheckFacade and the method validateIntegrity is executed on a background thread (using the executorService provided in the IntegrityCheckOnlineConfig).
updateAppProtectorPortalIdentifier
Use this method when you have the App Protector SDK with App Protector Portal implemented in your application.
This method sends a request to the integrity check backend with the App Protector SDK’s internal identifier. This allows the integrity check backend to notify the App Protector Portal about any integrity violations.
Call this method only if you initialise the IntegrityCheckFacade before the App Protector SDK’s RASPFacade object.
Note: This method call is unnecessary if the App Protector SDK is already initialised when you create the IntegrityCheckFacade object. This is because the Integrity Check SDK automatically detects the App Protector SDK during its own initialisation.
final UpdateExternalIdentifierResult updateExternalIdentifierResult = integrityCheckFacade.updateAppProtectorPortalIdentifier();

if (updateExternalIdentifierResult instanceof UpdateExternalIdentifierResult.Success) {
    // process success
} else if (updateExternalIdentifierResult instanceof UpdateExternalIdentifierResult.Failure) {
    // process error
}
The result of the updateAppProtectorPortalIdentifier method is an UpdateExternalIdentifierResult object
sealed interface UpdateExternalIdentifierResult {

    /**
     * Returned when [IntegrityCheckFacade.updateAppProtectorPortalIdentifier] executes successfully.
     * Contains the value of the App Protector Portal Identifier used.
     */
    data class Success(val externalIdentifier: String) : UpdateExternalIdentifierResult

    /**
     * Returned when [IntegrityCheckFacade.updateAppProtectorPortalIdentifier] fails to execute.
     * Contains the error that occurred during execution.
     */
    data class Failure(val error: IntegrityCheckException) : UpdateExternalIdentifierResult
}
The success object contains the identifier that was successfully sent to the integrity check backend.
The failure object contains an instance of the IntegrityCheckException object with details about the error that occurred.
Building
The integrity check plugin is applied to the configured build types and flavors every time a Gradle task that generates an archive is run.
The plugin will build an .apk or .aab file that is edited and resigned using the given signing configuration in build.gradle.
Archive that is configured with the Integrity check SDK will be saved in the build directory of the application module under the "outputs/integrity-check" path.
The original archive may not function because of the incomplete configuration of the SDK.
Add application to online integrity check backend
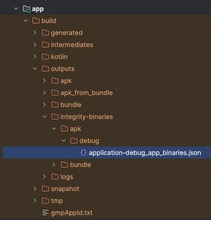
During the application build (if integrity check is applied to the build variant), a .json file is generated that is used for adding the application build to the online integrity check backend.
The file is created in the application module build outputs directory, in the integrity-binaries directory. The path depends on the type of artifact (.apk or .aab) and the build variant.
iOS Integration
Importing Integrity Check SDK
ASEEIntegrity SDK should be a starting point when implementing the integrity check solution. It is designed to be included in the iOS mobile application of which the integrity status should be evaluated. ASEEIntegrity SDK performs runtime calculations of the app signature that is SHA256 hash values derived from the application’s executable MachO files combined with the additional application parameters. The derived app signature value represents the integrity of the application. A change in the app signature indicates a change in the integrity of the application. When an integrity check is performed a runtime calculated app signature is compared with the precalculated value. Obtaining and the validation of the app signature is described in the next section.
The ASEEIntegrity SDK should be imported in the iOS applications by the developer as follows:
- copy the ASEEIntegritySDK.framework file from the release package to the iOS Xcode project
- set the Embed parameter of the added framework to Embed & Sign value

Licensing
To use the ASEEIntegrity SDK and the MacOS application a valid license has to be provided. The licenses are issued per iOS app and are tied to the bundle identifier. Each license should be entered in the MacOS app’s licensing menu and in the initialization function provided by the SDK.
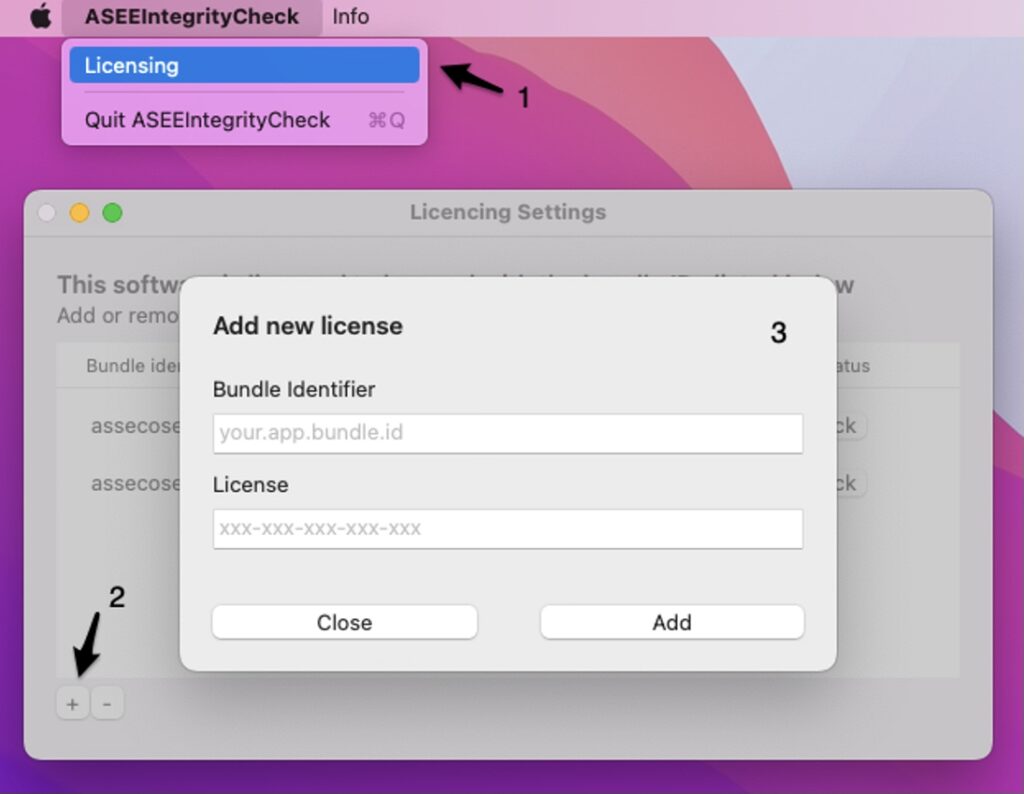
MacOS
The licensing menu can be accessed by choosing the Licensing option from the menu bar in the upper left corner of the screen. To insert a new license a plus button should be clicked. Once a valid license is inserted a bundle identifier will be listed in the menu and marked as valid.
To insert a license key, follow the next steps:
- Open the licensing menu
- Click on the plus button
- Insert the bundle ID and the license
SDK
To use the SDK a valid license must be passed to the initialize function. If an invalid license is passed to the function the ASEEIntegrityError with error code -2 will be thrown. In case an uninitialized SDK is used the integrity check will always result in failure and integrity will be considered compromised. To ensure the security of license string within iOS applications, it is strongly advised to use the ASEE iOS Obfuscation tool that will protect the license string from being exposed in plain text form.
    func application(_ application: UIApplication, didFinishLaunchingWithOptions launchOptions: [UIApplication.LaunchOptionsKey: Any]?) -> Bool {
        // Override point for customization after application launch.
        do {
            try IntegrityValidator.initialize(licenceKey: "xxx-xxx-xxx-xxx-xxx")
        }catch {
            print("Failed to initialize with error: \(error)")
        }
        return true
    }
Using Integrity Check SDK
After importing and initializing the integrity check SDK integrity can be validated by calling the validate integrity function as show below.
private func checkIntegrity() {
        IntegrityValidator.validateIntegrity {
            // define custom action on successful integrity validation
        } failure: { error in
            self.setIntegrityCompromisedImage()
            print("Integrity check failed with error: \(error)")
            // define custom action on unsuccessful integrity validation
        }
    }
Using Integrity Check MacOS Application
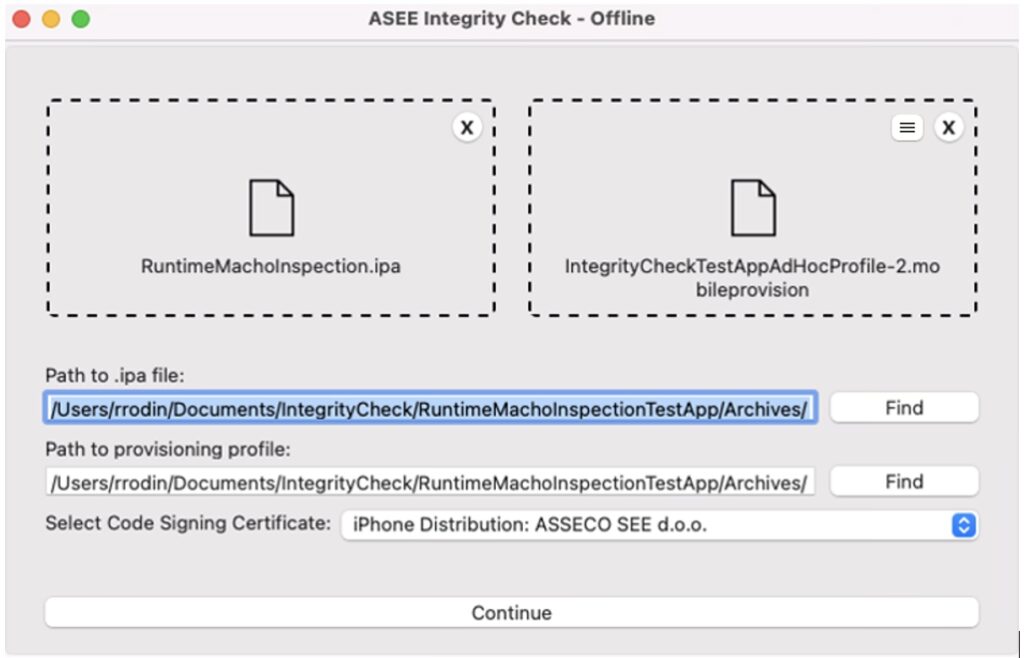
Main app signature is the main source of truth. In order to ensure that the state of the main app signature remains uncompromised, it has to be calculated before the application is published to the App Store and for that purpose ASEE integrity check MacOS application is used.
After a build process is finished and an .ipa file is exported from the Xcode project used during the development the main app signature can be calculated. It is done by dragging and dropping .ipa file and the corresponding .mobileprovision file in the designated areas of the MacOS application. After choosing the signing certificate and clicking the Continue button the calculation will start.
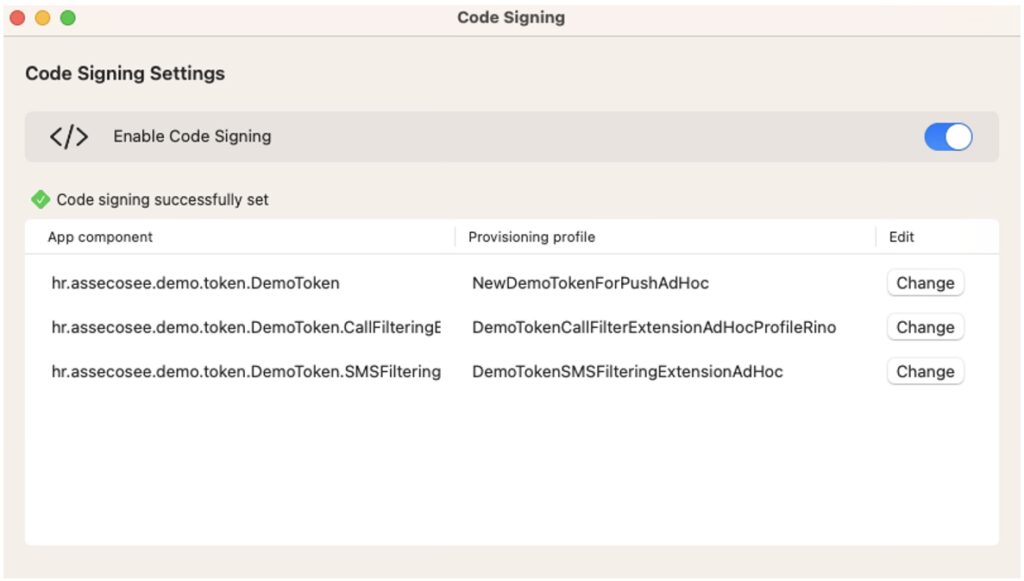
Code Signing
Code signing settings can be accessed by clicking the list icon ![]() that will appear when a provisioning profile has been dragged and dropped to the user interface. Code signing can be a complex process, often involving multiple parameters and configurations. This feature offers users a clear overview of code signing information, enabling them to verify the correctness of their parameters. Additionally, it provides the flexibility to toggle code signing on or off, empowering users to seamlessly switch between different code signing tools as per their preference. An example of code signing settings is shown below.
that will appear when a provisioning profile has been dragged and dropped to the user interface. Code signing can be a complex process, often involving multiple parameters and configurations. This feature offers users a clear overview of code signing information, enabling them to verify the correctness of their parameters. Additionally, it provides the flexibility to toggle code signing on or off, empowering users to seamlessly switch between different code signing tools as per their preference. An example of code signing settings is shown below.
An example of a successful main app signature calculation is shown in the figure below.
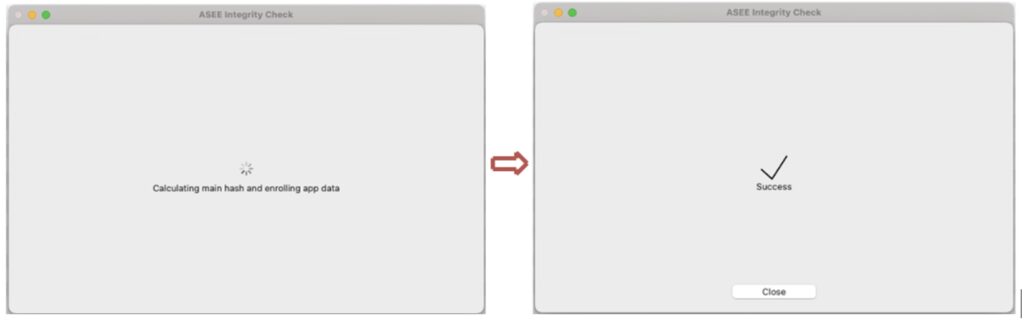
Once the main app signature is successfully calculated the .ipa file generated by the ASEE Integrity check tool can be run on an iOS device.
Online Integrity Check
Online Integrity Check is available for iOS 13 and above.The Online Integrity Check is a feature designed to verify the app's integrity by securely comparing the app signature with the online server. This process ensures that the app has not been tampered with or modified in any unauthorized way. Furthermore, if the App Protector SDK is integrated into the app, the new feature will automatically report any corruption in the app's integrity to the App Protector Portal. In case of any discrepancies, a notification will be displayed on the portal, alerting the team to potential issues and allowing for quick resolution.
MacOS
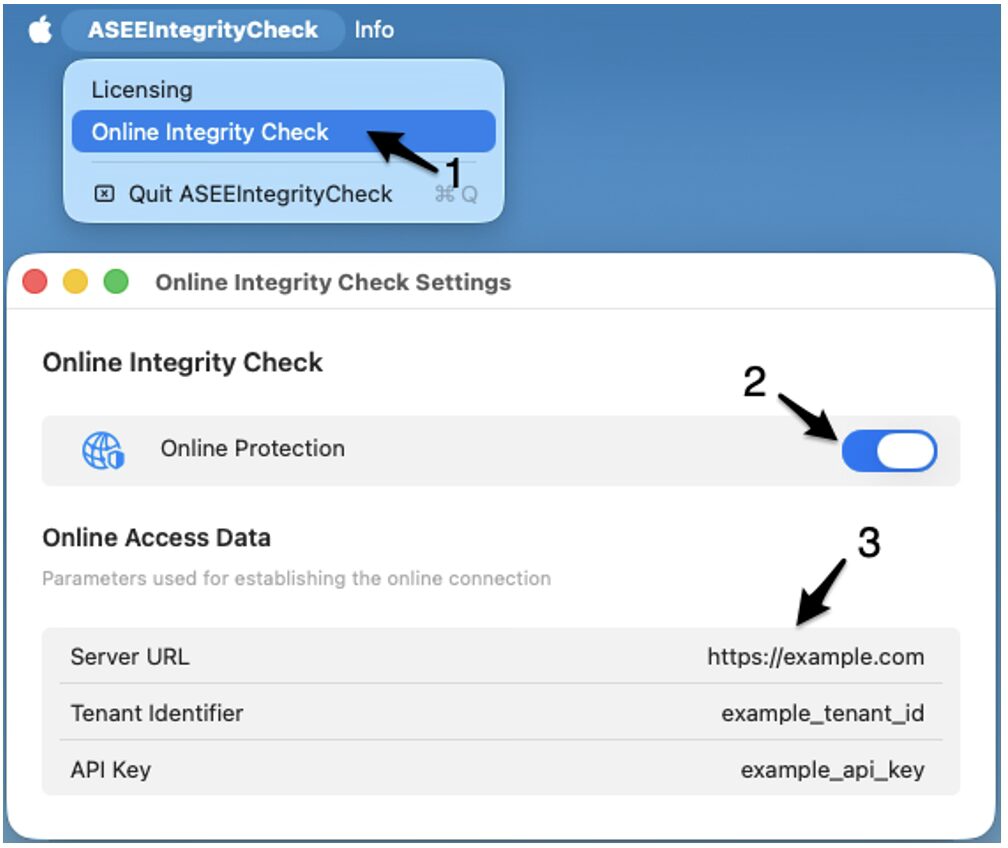
In Mac OS app, the online validation can be enabled by toggling the Online Protection switch in Online Integrity Check Settings. The settings window can be accessed by clicking the option in the menu bar as shown in figure below. To enable the Online Integrity Check, follow the next steps:
- Select the option from menu bar
- Toggle the Online Protection switch
- Insert the online access data (Server URL, Tenant identifier and API Key)
The SDK configuration and the online access data will be provided by ASEE.
SDK
To enable the Online Integrity Check the OnlineConfiguration should be passed when initializing the Integrity Check SDK as shown below.
let onlineConfig = OnlineConfiguration.init(
						serverURL: "[server_url]",
						recURL: "[rec_url]",
						tenantID: "[tenant_id]",
						keychainAccessGroup: "[team_id].[bundle_id]”,
						pollingPeriod: 3.0,
						pollingMaxRetries: 5)

try IntegrityValidator.initialize(licenceKey: Constants.integrityCheckLicenceKey,
                                  onlineConfiguration: onlineConfig)
Automation
To simplify integration of the App Protector Integrity Check with existing build automation tools, the main functionality is exposed via a command-line interface. Detailed instructions for using the integrity check through the CLI and integrating it with Fastlane are provided in the development guide.
