

What is Obfuscation?
Obfuscation is the act of creating source or machine code that is difficult for humans to understand. Like obfuscation in natural language, it may use needlessly roundabout expressions to compose statements.
Programmers may deliberately obfuscate code to conceal its purpose (security through obscurity) or its logic or implicit values embedded in it, primarily, in order to prevent tampering, deter reverse engineering, or even to create a puzzle or recreational challenge for someone reading the source code. This can be done manually or by using an automated tool, the latter being the preferred technique in industry.
The most common techniques of code obfuscation are renaming, control flow, dummy code insertion, and string encryption, code obfuscation.
String obfuscation is an established technique used by proprietary, closed-source applications to protect intellectual property. Furthermore, it is also frequently used to hide spyware or malware in applications. In both cases, the techniques range from bit manipulation over XOR operations to AES encryption.
The common implementation is to replace the string literal in the code (source, compiled, machine) using some type of cryptographic algorithm, then inject the code with the algorithm needed for decrypting the string in the program and call the decryption method on the encrypted string during runtime when the value of the string is needed.
If the encryption algorithm uses some kind of key or password, it is preferably hidden somewhere in the code of the program to make it more difficult for the adversary to exploit it. An even better approach is dynamically generating the key when it’s needed during runtime so the adversary can’t get to it using static analysis, instead dynamic analysis needs to be used which makes it more difficult to reverse engineer the plain-text values of the strings.
App Protector – Obfuscation implementations
The obfuscation tool can be used for native Android and iOS mobile applications.
Android devices
Android being an 'open' operating system leaves room for malicious actors to easily get a hold of an application’s source code. If this source code is not obfuscated, potential security exploits are left exposed, such as the possibility of attackers to steal the source code and repackage it as their own, get access to sensitive data, API calls or secrets like keys or passwords.
Android obfuscation is applied to the compiled code of the project classes and files using Gradle APIs and ASM bytecode manipulation library applicable for Android projects. Android plugin enables string and resource encryption.
Asee’s Android obfuscation tools cover the following:
- String obfuscation
- Resource file obfuscation
- Class encryption
- Control flow obfuscation
- Metadata removal (when compiling from Kotlin to Java)
iOS devices
iOS obfuscation covers String and Code obfuscation.
String obfuscation for iOS aims to enhance the security of sensitive string constants that can often be found in plain text format within the mobile app executable file. The security enhancement is provided in the form of white-box AES encryption performed during the development process of the iOS mobile application. After obfuscation is performed, the string literals found in the wanted files will be replaced with the corresponding cryptograms.
In order for an application to use the constants as initially intended (not encrypted), by the developer, the cryptograms have to be decrypted in the runtime. For that purpose, the SDK is used. The SDK should be imported in the iOS applications during its development phase.
Some of the string types included In string obfuscation include:
- Licences,
- URLs,
- Cyphers,
- API keys,
- Control flow
Control flow obfuscation
Control Flow Obfuscation is a software protection security technique that obscures a logical flow and makes code harder to understand without changing his functionality.
Even if an attacker gains access to the source or decompiled code, understanding the actual business logic and application behavior becomes extremely challenging.
Process starts with looking at the source code to find the important functions and parts of the program that need extra protection. After that, control flow needs to be changed in the way that normal sequence of instructions, like if-else statements, loops, and jumps are replaced with more complicated structures that do the same thing but they are harder to follow.
To do this, several tricks are used:
Opaque predicates - created by inserting conditional statements into the code that appear complex, but their outcome is always true or false. They often involve mathematical expressions, constants, or functions that seem to depend on variables, but actually do not change what the program does, and make it confusing to read and understand.
Junk Code Injection – inserting unnecessary code just to throw off anyone trying to understand the program.
Control flow reordering – involves rearranging code blocks, shuffling the order of instructions, and using indirect jumps or complex conditions to direct the program’s execution.
Using these techniques together makes the program work the same as before, but the important parts are much harder to understand.
Android integration
The following section explains how to setup the Obfuscation SDK in your Android project.
Include Obfuscation
There are multiple ways to include the Obfuscation SDK in your project.
Include as a local dependency
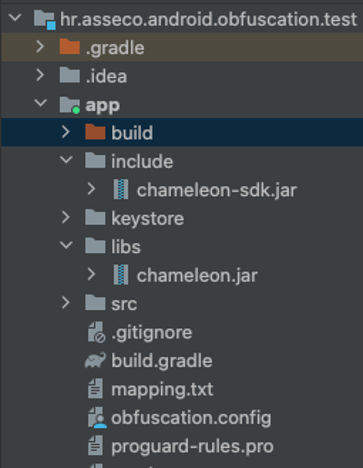
Add the chameleon-1.5.2.jar file somewhere within your Android Studio project (for example in the 'libs' folder like in the picture below)
Inside the buildscript scope of the project scope build.gradle file you must add the following repository entry with the relative path to the .jar file
buildscript {
    repositories {
    	flatDir {
            dirs("location-to-plugin-jar")
    	}
    }
}
Add the plugin id as a classpath dependency (in the root project build.gradle file) and set the current version:
dependencies {
    classpath("com.chameleon:chameleon:1.0.0")
}
In the main application module’s build.gradle file, apply the following plugin id:
plugins {
    id("com.chameleon")
}
Next, add the SDK jar (chameleon-sdk-1.5.2.jar) through the dependency block in the build.gradle files of the modules in the project where on demand integrity validation is used. (the default is the app module).
dependencies {
    implementation(files("location-of-sdk.jar"))
}
Include using custom online repository
If you have your own online maven repository, add the artifacts to the repository, and include the repository to the project:
buildscript {
    repositories {
    	maven {
    	    url = mavenRepoURL
        	credentials {
        		username = artifactoryUser
        		password = artifactoryPwd
            }
    	}
    }
}
artifactoryUser and artifactoryPwd variables need to be replaced with credentials to access the custom server.
Then the SDK .jar archive can be added to the online repository and can be added as dependencies just using their group id, artifact name and version (standalone or withTokenSdk).
dependencies {
    implementation("com.chameleon:chameleon-sdk-standalone:1.5.2")
}
Plugin still needs to be added to the root project build.gradle file using the classpath configuration:
dependencies {
    classpath("com.chameleon:chameleon-plugin:1.5.2")
}
And in the main app module’s build.gradle file, apply the following plugin id:
plugins {
    id("com.chameleon")
}
Plugin configuration
Add the chameleon {} instruction after the android configuration block in the build.gradle file of the app module
android {...}

chameleon {}
Inside the block, parameters need to be configured before usage.
There are several configurable plugin variables. There can be multiple configurations defined (like signing configurations, flavor definitions etc.)
To define a configuration, one must use the configs function inside the chameleon call with a custom name (in example below set to „general“).
android {...}

chameleon {
	configs {
		create("general") {
			...
		}
	}
}android {...}
chameleon {
configs {
general {
...
}
}
}configs parameters
Short overview of all the different parameters used in the configuration of each obfuscation feature.
buildTypes and flavors
Build types and flavors for which the plugin is run can be configured using the buildTypes and flavors parameters respectively.
The flavors parameter is a map object. The key for the map is the flavor dimension key string and the value is a list of all the flavor dimensions. For instance, if you have the flavor dimension environment, then the values would be something like in the example below:
general {
	...

	buildTypes = listOf("release")
	flavors = mapOf("environment" to listOf("production", "dev", "demo"))
}
In the example shown, integrity check is applied to all variants that are of the build type release and of the environment production, dev or demo.
configFile
The location of the configuration file where the classes and resources to be included in obfuscation are defined (relative to the current build.gradle file module directory, by default called the app module)
general {
	...
	configFile = "obfuscation.config"
}
Other parameters
Parameters that are the same for all the features and across all configurations. Need to be set directly inside the chameleon scope.
applicationClass
It is necessary to define a class that inherits the Application class of the Android library. If there is no such class in the project, it needs to be implemented and set up.
android {...}

chameleon {
	...
	applicationClass = "com.android.application.ApplicationMain"
}
Application class is required because code is injected into the onCreate method that initialises the components used in decryption.
licenceKeys
Before use, a valid licence key must be added to the configuration. The licence key is bound to the application id, so a particular licence key can only be used for one application.
Format for adding licence keys is in form of a map with key being the application id and the value being the licence key, both in string format.
android {...}

chameleon {
	...
    	licenceKeys = mapOf("com.example.app"       to  "23E35GD3-055E3539-AEFA25FD-DA2AD2A3-0D128D36",
                    		"com.example.app.test"  to  "3D5CB33A-1B170D42-BE89EC53-AD184B75-3D6DD4EE")
}
Feature configuration
The available features are string encryption, resource encryption, metadata removal, dead code injection and class encryption(experimental). To include them in the project, a configuration must be assigned to them (instructions for defining a configuration in the previous section).
stringEncryption {
    configuration("general")
}

resourceEncryption {
    configuration("general")
}

removeMetadata {
    configuration("general")
}

classEncryption {
    configuration("classEncryption")
}

deadCodeInjection {
    configuration("general")
    injectionClassesSize(25)
    injectionClassesPackagePrefixes(["com", "example"])
}

controlFlowTransform {
    configuration("controlFlowTransform")
    arithmeticOperandsRange {
	maxOperandsValue = 15
    	maxOperandsSize = 10
    	minOperandsSize = 3
    }
    enableArithmeticTransform = true // if false then disabled
    enableIfStatementFlattening = true // if false then disabled
}
It is recommended to setup a separate configuration for class encryption with a separate config file for defining which classes are included in class encryption because they are obfuscated separately from the other features so classes that are encrypted do not have other features applied.
I.e. if a class has the class encryption feature applied, it cannot have string or resource encryption applied because of the current class encryption process and limitations of Gradle and AGP.
deadCodeInjection
The dead code injection feature can be additionally configured.
The parameter injectionClassesSize is used to configure the number of generated classes used in dead code injection. Greater number increases security but results in a bigger application size.
The default value is 20. The minimum value is 5, while the maximum value is 100.
The parameter injectionClassesPackagePrefixes is used to configure the package name prefix for the generated injection classes. It is a collection of string values, each string representing a package segment in the package name. They are prepended in their respective order in the collection.
This parameter is empty by default.
controlFlowTransform
This part contains two features. Arithmetic transform and if statement flattening.
Arithmetic transform obfuscates integer constants in the code by transforming them by using basic mathematical operations that when calculated result in the original number.
The parameters in the ArithmeticOperandsRange class that are used to configure the operands in the transformation:
maxOperandsValue– the maximum value of the operands used in the transformationminOperandsSize– the minimum number of mathematical operations used in the transformationmaxOperandsSize– the maximum number of mathematical operations used in the transformation
To disable this control flow feature, set the parameter enableArithmeticTransform to false (default is true)
If statement flattening transforms if/else statements by converting them to an while statement with a switch case that uses a single state variable to decide the execution order of the code.
To disable this control flow feature, set the parameter enableIfStatementFlattening to false (default is true)
Configuration file
The class containing strings that you want to obfuscate must be added to a configuration file (in our case it is named "obfuscation.config") within the directory of the main module.
The line should start with the class keyword followed by the package name:
class com\.example\.package\.ExampleClassRegex patterns (regular expressions) are used. While writing the patterns, the dots that are a wildcard character in the regex should be properly “escaped” (e.g. com.example would also accept comcexample package name)
class com\.example\.*The plugin will obfuscate strings in all classes within the com.example package (com.example.IncludedClass, com.example.OtherClass, com.example.model.User, com.example.ui.FragmentA)
All string variables that are not final and static or const val defined in the companion object in Kotlin (variables that are not constants) and string literals will be obfuscated, and each initialization of these variables will be replaced with the return value of the decryption method.
The references to constants are replaced with their values in code by the JVM, so their variable values will be set to null, as they are not used/referenced.
To obfuscate top level constants/strings in kotlin files it is necessary to write the keyword topLevel in the configuration file, followed by the package name of the file in which they are located (all top-level variables from that file will be obfuscated).
topLevel com\.example\.StringConstantsIt is also possible to add comments by adding a '#' sign to the beginning of the config file line:
# This is a comment

# This is another comment
By adding the character '!' before pattern keywords, the specified classes/files containing top-level variables are excluded from obfuscation.
Useful when using a wildcard pattern that includes some packages and classes that you want to be excluded, without the need for them to be specified individually.
!class com\.example\.ui\.CustomView

!class com\.example\.ui\.views\.. *

!topLevel com\.example\.ui\.Constants
To define what resource file or asset are to be obfuscated (encrypted) with this plugin, they have to be added to the configuration using the resource keyword.
resource R.raw.gif_file

resource asset_file
iOS Integration
ASEE iOS Obfuscator offers the following main functionalities:
- String Obfuscation – enables obfuscation of string literals so that an attacker cannot easily read strings from a disassembled app.
- Code Obfuscation – aims to obscure the internal programming logic of a mobile application by performing low-level modifications on the executable files in Mach-O format, hindering attackers from understanding it.
- Control flow obfuscation - a set of different techniques that are used to make the control flow of a program more difficult to understand
Listed functionalities will be described in more detail in the following sections.
Licensing
To use the Deobfuscator SDK and the MacOS application a valid license must be provided. The licenses are issued per iOS app and are tied to the bundle identifier. Each license should be entered in the MacOS app’s licensing menu and in the initialization function provided by the SDK.
MacOS
The licensing menu can be accessed by choosing the Licensing option from the menu bar in the upper left corner of the screen. To insert a new license a plus button should be clicked. Once a valid license is inserted a bundle identifier will be listed in the menu and marked as valid. Android application IDs are used for Flutter strings obfuscation. If iOS and Android IDs are identical, they must still be imported as separate licenses by selecting the appropriate platform for each. An example is shown in figure below.
To insert a license key, follow the next steps:
- Open the licensing menu
- Click on the plus button
- Select platform and insert the bundle ID and the license key

SDK
To use the SDK a valid license must be passed to the initialize function as show in the code snippet. If an invalid license is passed to the function the DeobfuscatorError with error code -2 will be thrown. In case an uninitialized SDK is used the runtime decryption will always return an encrypted string.
func application(_ application: UIApplication, didFinishLaunchingWithOptions launchOptions: [UIApplication.LaunchOptionsKey: Any]?) -> Bool {
// Override point for customization after application launch.
do {
try Deobfuscator.initialize(licenceKey: "xxx-xxx-xxx-xxx-xxx")
}catch {
print("Failed to initialize with error: \(error)")
}
return true
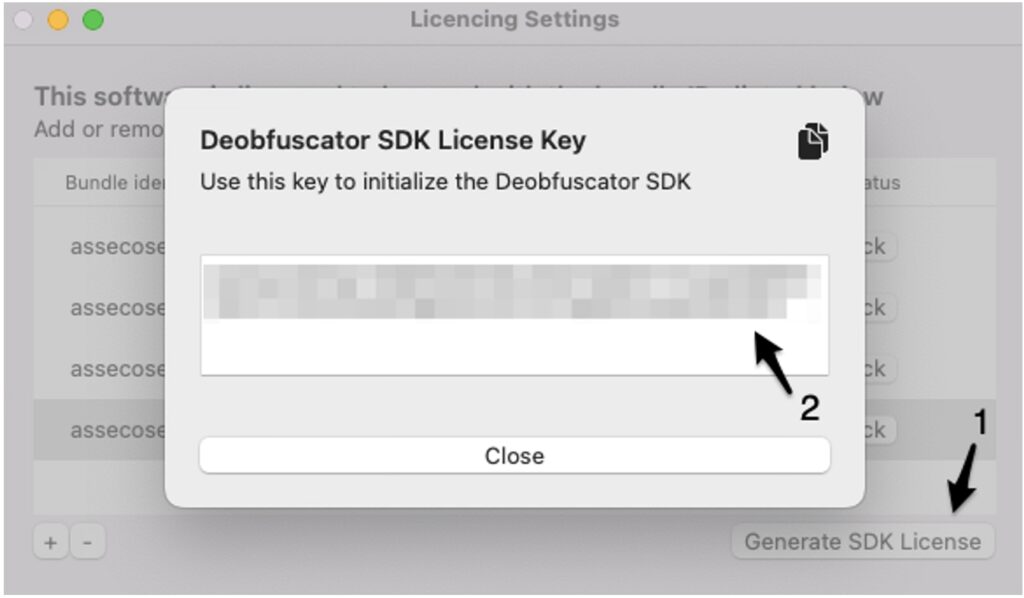
}The license key required for initializing the Deobfuscator SDK can be generated by selecting the licensed bundle ID from the provided list and clicking the "Generate SDK License" button. This action will display a window presenting the license key, which can then be utilized within the selected iOS application. An example is shown in figure below.
To generate the SDK license key, follow the next steps:
- Click the Generate SDK License Button
- Copy the license key shown on the screen
String Obfuscation
This functionality aims to enhance the security of sensitive string constants that can often be found in plain text format within the mobile app executable file. Some examples of such constants are:
- API keys
- API endpoints
- Pinned public keys or certificates
- License keys
The security enhancement is provided in the form of white-box AES encryption performed during the development process of the iOS mobile application.
How to Use
Step 1
Add path to Xcode or Android studio Flutter project
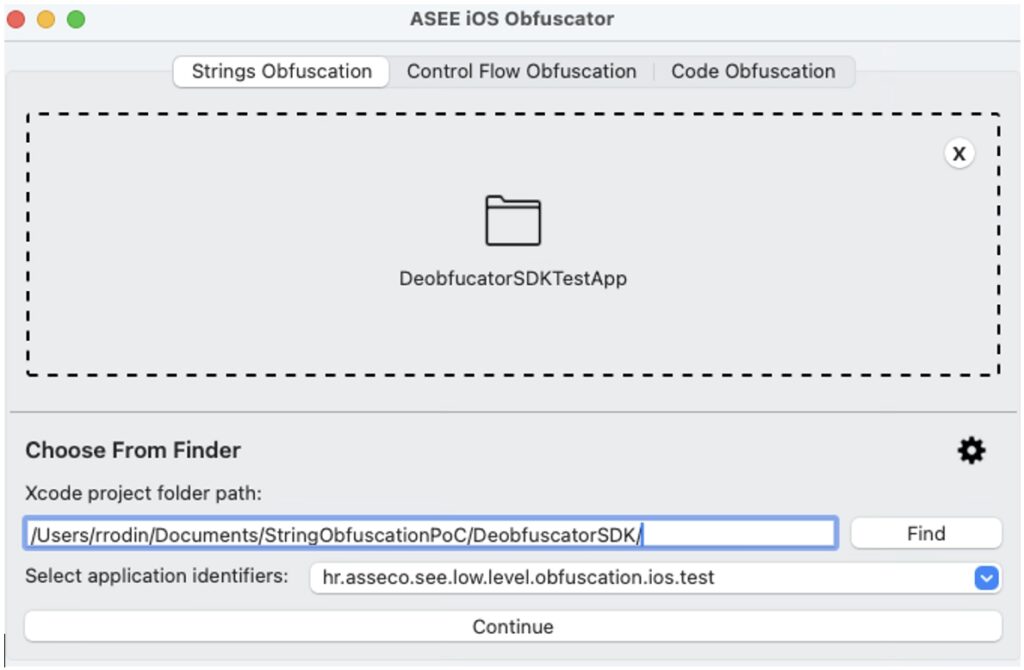
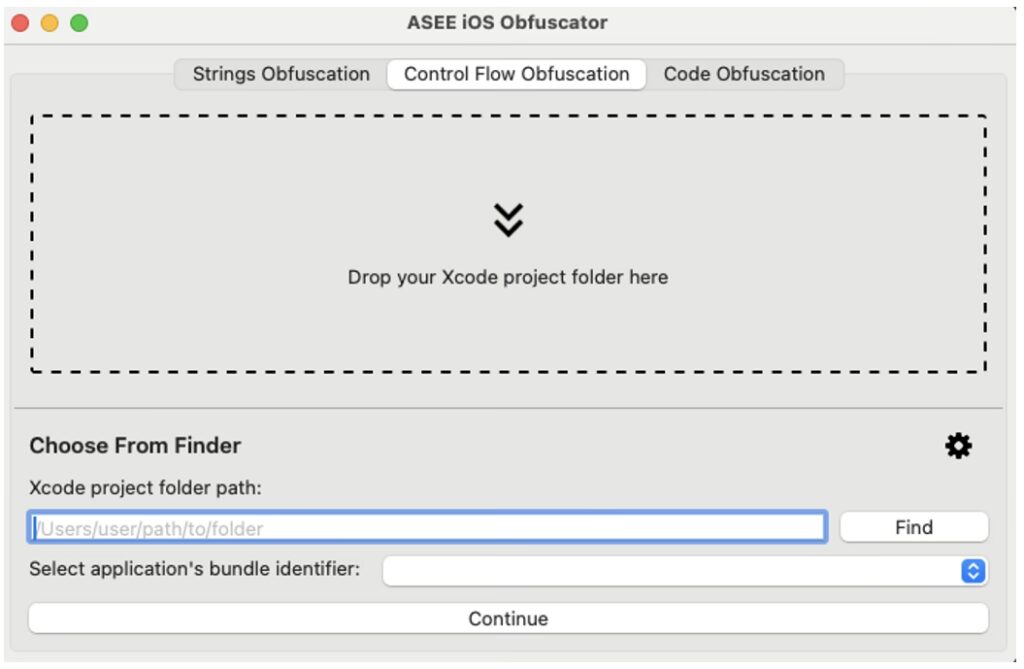
To run the encryption, the developer can drag and drop the folder containing the Xcode project in the designated area of the ASEE iOS Obfuscator. Alternatively, the project folder can be selected through the Finder by clicking the Find button or the path to the folder can be given in text format. Figure below shows the interface of the ASEE iOS Obfuscator after the selection of the project folder.
Step 2
Choose Bundle identifier
It is imperative to carefully choose the appropriate bundle identifier for the app that will undergo processing. When strings are obfuscated using one bundle identifier and then deobfuscated using a different one, the outcome becomes inaccurate, rendering the strings unusable. Hence, caution is of utmost importance.
When enabling string obfuscation in a Flutter project, both the iOS Bundle ID and the Android Application ID must be selected. Even if the two IDs are identical, they must still be selected separately from their respective sections.If no bundle identifiers are available for selection, it indicates that the licensing setup is incomplete. In such cases, it is necessary to add a valid license as described in the Licensing section, ensuring proper functionality. After clicking the continue button the obfuscation tool will analyse the given project folder and present the list of the files available for obfuscation. The list is shown in figure below.
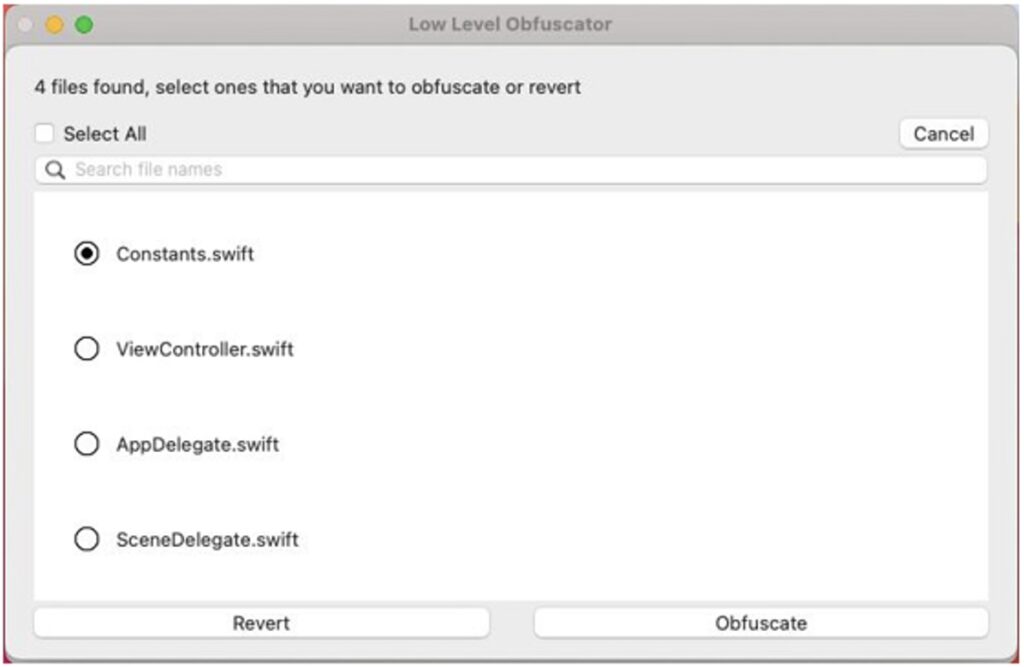
To have better control over what is obfuscated it is suggested to extract strings that will
be obfuscated in a separate class.
The searchable list of files available for obfuscation enables the user to select the files that will be passed to encryption stage. For this demonstration only the Constants.swift file will be selected since it is the only file in the project that contains security sensitive strings. Contents of the Constants.swift file before obfuscation are shown in the snippet below.
struct Constants {
    static let mtmUrl = "https://mtm.url.com"
    static let dskppUrl = "htps://dskpp.url.com"
    static let niProxyUrl = "https://ni.proxy.url.com"
    static let publicKeyExponent = "1234"
    static let MTM_ORGANIZATION_ID = "120"
    static let serviceId = "55"
    static let licenceKey = "DGEJ47-SHDGR3-LFYBSK-WLVHTV-ECYK3H-JEG7CH"
}
Step 3
Click “Obfuscate”
After clicking the Obfuscate button the selected files will be analysed and all the string literals found in the files will be replaced with the corresponding cryptograms in base64 format. The cryptograms will be wrapped with the Deobfuscator SDK function call and the import statement for the Deobfuscator SDK will be added to the import section of the file. The purpose of the Deobfuscator SDK will be described in more detail in the following sections. The contents of the Constants.swift after obfuscation is shown in the snippet below.
import DeobfuscatorSDK

struct Constants {
    static let mtmUrl = Deobfuscator.deobfuscate(base64: "FnX8DnlY8vXKRvLPWaz68lpPh8TeIuxqv/FEdFVJkqgAVkjyOf14j+n1jQS7q6t7eITwQVi4aTMzJ8fISasJ0j2xotKW29FqbafeaHIS6GaDsoZrHQQBv1nNAAtiRID3ixEAAA5G")
    static let dskppUrl = Deobfuscator.deobfuscate(base64: "4YeB5kksZzvEVnLxh5jm2dkHFehJxWrk2mg+Qll5iDQkaSovj9YTkcs0Z22JlnyRjxYOH+a6GFwvMDNj5XyZKLs94GIPF66yrpo03K3SGy9+gHQhW5x5WVSNXuVQMjtdYckAABib")
    static let niProxyUrl = Deobfuscator.deobfuscate(base64: "BC2LgZ6/sanV60naxtyP7jcdm6DdTEsSlmpnbN3hioyzrgLsMO0nozEDwZgGEAvKB1eJqj4gVboQb6/9zDEyW8pZlIkaWE6nLq2Miald/teBCVgsitdxKIeCVPc/6qVddjcAAAg4")
    static let publicKeyExponent = Deobfuscator.deobfuscate(base64: "ee9yq/+X6Wu/73vXH8dMfILRSlP9TfolNowLVdvPQGOx8RBApQEfMTKlkLucGtMncfWh+ubz4CcL9aaWwgP3bW1ae2XoDwHhWWM+Uyrt/PYXRwAAFLM=")
    static let MTM_ORGANIZATION_ID = Deobfuscator.deobfuscate(base64: "jIBLkFtd11N+dUk+k0sge0X8XWZ7j9CWgE2V0FJIoLo1CyfCECoNizLO3zIzLWcwGebq7BzrvGjp3+v8Mo6gqqtvPfQgOOKxDEmYTWG2CfLPQwAADZE=")
    static let serviceId = Deobfuscator.deobfuscate(base64: "O4B7VfpJKTRhaaO12QHLOlKOQrEnrmntpQSpz6lLqm68UWxFae7CMTMuH8MJwm2PhiJfkC8yPvxO8Xhg1tWnZO8zsJXuwsn2GRiwmwNRQ6O3rQAACc4=")
    static let licenceKey = Deobfuscator.deobfuscate(base64: "JF+/r2kwo7u0Drfz09/1khsWRVa7s5rjFVc66fGQCNmpSFkpUYYoM9h4DfiA1a5l+D1p0OJrpWGNl0NEcNct3GjlhaIajEjtUzIyfBvTH5C6HvpgxAy/loglogZh3mb5ENPkBcnsKRM8X4v7Q9ZovBeAAAAOxw==")
}
Since the cryptograms are calculated using AES encryption, extraction of plain text values while preforming static analysis should not be straightforward for the attacker.
For an application to use the constants as initially intended by the developer the cryptograms must be decrypted in the runtime. For that purpose, the Deobfuscator SDK is used.
The Deobfuscator SDK should be imported in the iOS applications by the developer as follows:
- Copy the DeobfuscatorSDK.xcframework file from the release package to the iOS Xcode project,
- Set the Embed parameter of the added .xcframework to Embed & Sign value.
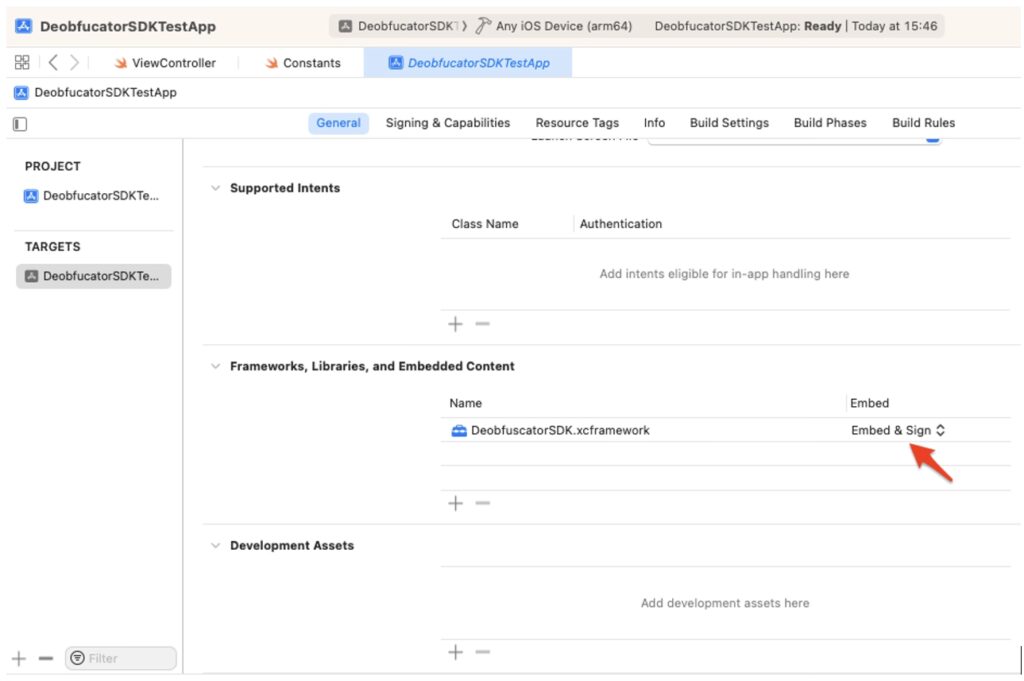
To use the SDK a valid license must be passed to the initialize function as shown in the Licensing section.
Exceptions
The Obfuscator has a minimum supported string length of two characters. This means that it will ignore string literals that are either one character long or empty. Additionally, string literals within both single-line and multiline comments will be ignored, except for comments that do not start at the beginning of the line. If string literals are found within such comments, they will be obfuscated. Furthermore, the following cases will not be obfuscated:
- String interpolation – string literals that include values of constants, variables, literals and expressions (e.g. “String interpolation example \(variable)” )
- Strings containing the following special characters:
- \0 – null character
- \\ - backslash
- \t – horizontal tab
- \n – line feed
- \r – carriage return
- \” – double quotation mark
- \’ – single quotation mark
- \u{n} – unicode scalar value
Enums
When obfuscating enumerations prepopulated with string-type raw values the following syntax should be used. This ensures that retrieving the computed value is possible, otherwise, the obfuscation will not function correctly. Enumerations defined using syntax different from the proposed one will be ignored and not subjected to obfuscation.
Code Obfuscation
The second functionality provided by the ASEE iOS Obfuscator is the Code Obfuscation. The purpose of this functionality is to prevent the attacker from understanding the internal programming logic of the mobile application. This is done by preforming the low-level modification of the executable files in the Mach-O format. The symbols containing internal names (e.g., class names, function names, variable names, etc.) defined by the developer are extracted from the sections of the Mach-O file and replaced with the randomly generated strings. In this way the symbols that can be extracted from the final app package during the process of reverse engineering have no descriptive value that can help the attacker to understand the internal programming logic of the mobile application.
How to Use
Step 1
Add .ipa file you want to obfuscate and the corresponding .mobileprovision file
To perform the code obfuscation of the iOS application using the ASEE iOS Obfuscator it is necessary to first create an application archive file that contains the iOS app (.ipa file) through the standard build process.
It is also necessary to have the corresponding .mobileprovision file used for code signing. If all the stated conditions are met the Code Obfuscation tab in the ASEE iOS Obfuscator's user interface can be selected and the corresponding files can be dropped in the designated drag-and-drop areas or the files can be selected using the alternative methods.
The user interface after the successful selection of .ipa and .mobileprovision files is shown in figure below.
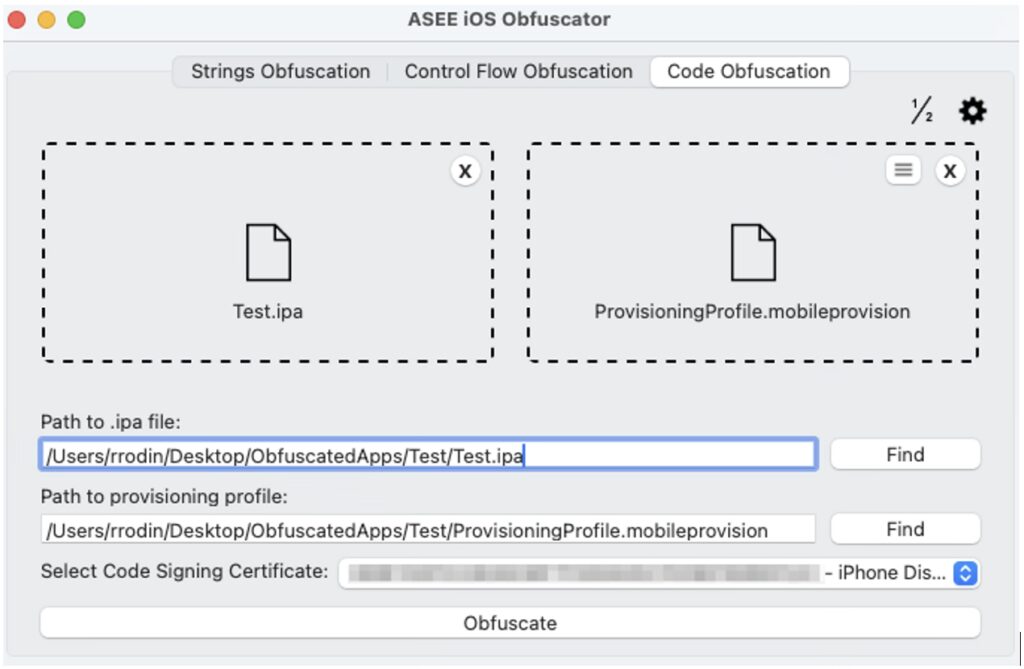
Step 2
Select code signing certificate from the drop-down menu.
Step 3
Click “Obfuscate” button
Once the obfuscate button is clicked the obfuscation of all the Mach-O files within the application archive will be performed. After the obfuscation process finishes the modified .ipa file will be resigned using the attached provisioning profile and the chosen signing certificate.
Step 4
Test created .ipa file
The resulting .ipa file will be ready to install on the mobile devices or upload to the App Store.
The ASEE iOS Obfuscator is still in the early development stage; hence the current version does not provide obfuscation support for .nib or storyboard files.
The results of the obfuscation process can be verified using MachOView, Hex Fiend, IDA Pro or similar third-party software.
It is possible that a new application will crash on start. The Development Guide provides detailed instructions on how to recover from such errors.
Control Flow Obfuscation
Control flow obfuscation is a set of different techniques that are used to make the control flow of a program difficult to understand. This is often done to protect the code from being reverse-engineered or tampered with. The main goal is to obscure the logical flow of the program, making it harder for someone to analyse and understand the code's structure and its behaviour.
The ASEE iOS Obfuscator implements the dead code injection, an advanced control flow obfuscation technique that focuses on injecting the code that does not affect the app’s outcome but makes the control flow more complex.
In the app bundle, this technique is applied to the main app executable by modifying and adding segments and sections. Furthermore, strategically inserting bogus code that mimics legitimate program logic but performs no functional task serves to additionally obscure the app's true behavior.
The difference between dead code and bogus code lies in their execution and purpose: dead code is never executed during the program's runtime, serving as unreachable noise that complicates the codebase, whereas bogus code is executed but performs no meaningful function, intentionally misleading attackers by simulating legitimate logic to obscure the application's true behaviour.
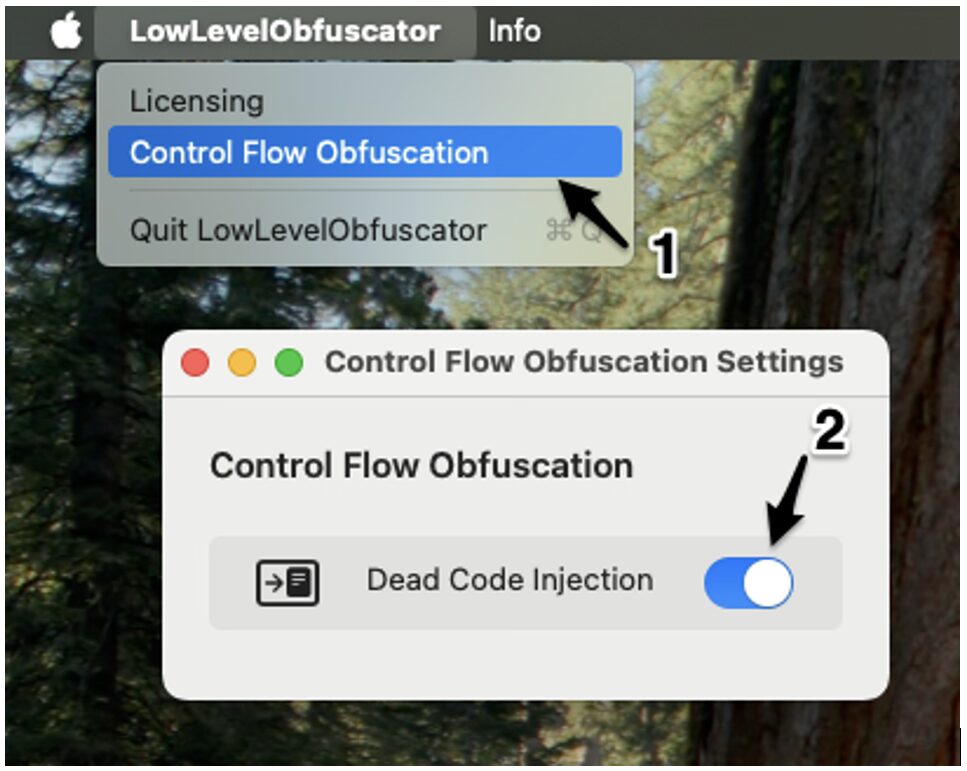
Both dead code and bogus code injection will be applied when the 'Dead Code Injection' switch is turned on in the Control Flow Obfuscation settings, which can be accessed from the menu bar, as shown in figure below.
To strengthen protection against reverse engineering and static analysis, this solution offer Advanced Control Flow Obfuscation techniques designed to make source code significantly harder to understand. This layer of protection targets the program’s logical structure, focusing on disrupting the flow and readability of control structures to resist automated tools and manual analysis.
This feature includes:
- Control Flow Flattening – a transformation applied to
ifstatements in the source code. It rewrites conditional branching into a state-machine-like structure, replacing straightforwardif/elselogic with a dispatcher-based flow. This transformation breaks the visible control structure and disperses logic across multiple switch cases or state branches. - Opaque Arithmetic Predicates – used to disguise the logic inside conditionals by inserting mathematically equivalent but harder-to-read expressions. OAP is applied to
ifandwhileconditions using arithmetic noise or complex mathematical functions.
This solution supports two techniques for applying opaque arithmetic predicates:
Redundant Arithmetic Operations
Adds extra, meaningless arithmetic that evaluates to the original value:
// Original
if (a > 5) {
  print("Test")
}
// After applying opaque arithmetic predicates
if (a > (7 - 2)) {
  print("Test")
}
Complex Mathematical Functions
Uses square roots, exponentials, and similar operations to disguise constant values:
// Original
if (a > 5) {
  print("Test")
}
// After applying opaque arithmetic predicates
if (Double(a) > (pow(4.0, 2.0) - 11)) {
   print("Test")
}
Redundant arithmetic operations and complex mathematical functions are applied randomly. This technique is automatically combined with the Control Flow Flattening so that both the structure and the logic of conditional statements are obfuscated. This combined approach significantly increases resistance to decompilation and reverse engineering.
Example – control flow flattening combined with the opaque arithmetic predicates
Following is the example of the original code without obfuscation:
class Test {
  func example (a: Int) {
    if a > 30 {
        print("one")
    } else if a > 15 {
        print("two")
    } else {
        print("three")
    }
  }
}
Following is the example of the same code after advanced control flow obfuscation techniques have been applied:
    func example(a: Int) {
        var aseeCFOstate = 0
        let aseeCFOEND = -1
        while (aseeCFOstate != aseeCFOEND) {
            switch aseeCFOstate {    case 0:
                if (a > (36 - 6)) {
                    aseeCFOstate = 1
                } else {
                    aseeCFOstate = 2
                }
                break
            case 1:
                print("one")
                aseeCFOstate = aseeCFOEND
                break
            case 2:
                if (Double(a) > (pow(3.0, 3.0) - 12)) {
                    aseeCFOstate = 3
                } else {
                    aseeCFOstate = 4
                }
                break
            case 3:
                print("two")
                aseeCFOstate = aseeCFOEND
                break
            case 4:
                print("three")
                aseeCFOstate = aseeCFOEND
                break
            default:
                aseeCFOstate = aseeCFOEND
                break
            }
        }
    }
This technique is applied at the source code level, similar to the Strings Obfuscation techique, but it produces a different type of output. To enable it, navigate to the Control Flow Obfuscation tab and follow the same workflow used for applying strings obfuscation.
Automation
To simplify integration of the App Protector Obfuscation solution with existing build automation tools, the main functionality is exposed via a command-line interface. Detailed instructions for using the obfuscation solution through the CLI and integrating it with Fastlane are provided in the development guide.
